Wiring is a tricky task for car maintenance beginners. One wrong move can cause a lot of damage and burned-out parts. And to add more confusion, even the color-coded wiring diagrams drastically differ from one vehicle to another.
There is no universal standard for headlight wire color codes across all models. Each car will have a different diagram according to its wiring peculiarities and also the headlight itself. You need to learn what each wire color means inside your headlights to wire them properly.
They differ so much that even the same car model can have different diagrams across the model years. But the good news is that understanding these diagrams is relatively easy. Once you get the hang of it, it’s all very simple to work with.
Diagram Headlight Wire Color Code Guide
So, there are no identical headlight wiring diagrams, but how can you navigate through all those colored wires by yourself? There are some similarities and patterns in how they are attached, their functions, etc. For instance, all headlight wires can be roughly categorized into high beam, low beam and ground wires. The trick is to figure out which wire goes where.
Ground wire
To identify the ground wire, look at the headlight plug. It is usually attached to the left side of the headlight plug, although its color code can differ from one model to another. But usually, this wire is coded with black.
Low beam
As for the low beam wire, you can find it in the middle of the plug. Regardless of the color, this position should give you a clue about its function.
High beam
And finally, to the right, you will find the high beam wire. It is often dyed red, but that is not a rule, so do not let the color fool you.
Comparing Wire Color Codes in Different Headlights
|
Headlight |
Ground |
Low Beam |
High Beam |
|
Headwinds |
Black |
Yellow |
White |
|
Trade Winds |
Black |
Red/Black |
Red |
|
U.S. Headlights |
Black |
Red/Black |
Red |
The best way to deal with headlight wiring is to consult a reliable diagram provided by the manufacturer. This way, you can get the necessary information about the wire color codes and locations. But that doesn’t mean you cannot find out what’s what by yourself. To do that, you can use this tip about the location on the plug or try to test the wires.
How to Test the Headlight Wires for Functions?
Polarity is crucial when you wire the headlights in place. If you mess this up, the headlight may be destroyed beyond repair, so this must be done very carefully. If you don’t have access to the diagram and color codes, you can actually use a voltmeter or a multimeter to test each wire. This method will help you find the negative, positive and ground wires.
Testing headlight wires with a multimeter
-
Remove the plug connected to the headlight.
-
Set your multimeter to 12-Volt DC.
-
Ensure that the meter leads are properly connected.
-
Turn on the headlights and dim the lights.
-
Connect the black test lead to the vehicle frame with no rust or paint.
-
Connect the red test lead to one of the three holes in the disconnected plug.
-
The meter should read around 12-13 volts, indicating a positive wire.
-
If there is no reading on the meter, the wire is negative and corresponds to the high beam side of the headlight plug.
-
Switch the lights to high beam and repeat the process for 12 volts, which represents a positive wire for high beam.
-
The remaining wire is the ground wire.
Testing headlight wires can help you decipher the color code of the diagram. Take notes for the future on what wire color corresponds to what function inside the headlight. With this information, you will be able to effortlessly do the wiring and repair or replace headlights whenever you need it.
Understanding the Headlight Plug Wiring Diagram
The headlight plug diagrams look very simple. They have information about the ground, high beam and low beam wires, their color codes and where they must be attached. But no matter how simple it is, you need to know how to read it properly.
First of all, the headlight plug is drawn as the way it looks when you take out a headlight and look at its back side. Some diagrams have the back side marked for your convenience to avoid any confusion.
The wires are supposed to be marked this way:
-
The ground wire is attached to the left side.
-
Low beam wire attached to the middle.
-
High beam wire attached to the right side.
Don’t forget that different headlights and even car models can have varying headlight plug diagrams, so we insist on checking them before you do anything.
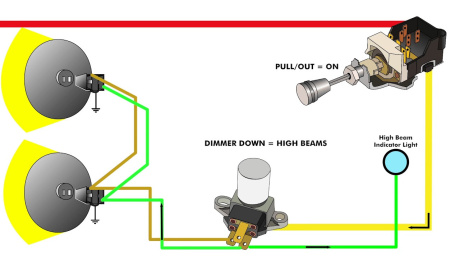
Reading the 3-Wire Headlight Wiring Diagram
The 3-wire or 3-prong headlight wiring diagram shows a simplified look of your headlight socket wiring. It should give you a clue which wire is high beam, low beam or ground.
If you misplace a wire in a socket and wire it wrong, you can fry the headlight. This diagram, together with the wire color code, is supposed to direct you through the rewiring process. All you need to do is find out which wire corresponds to what function in the headlight and consult the diagram to connect everything neatly.
How to Read Headlight Socket Wiring Diagram?
Headlight sockets power the entire headlight, without proper wiring, they can burn down the crucial pieces. Thankfully the socket diagrams help you connect each wire to the terminal where it belongs using different symbols and color codes.
These useful diagrams vary among models and years, so to get the correct one, you must first dig up the manual or visit the manufacturer’s website for more information. You can also figure it out without the diagram using a multimeter, but this method is too much of a hassle.
You should not use just any generic wiring diagram to assist you in this process. Some diagrams have discrepancies for different car models, headlights and even model years. This is important to understand before you let the power do the damage in a poorly wired headlight.
Using a headlight socket wiring diagram
-
Carefully disconnect the car's battery ground terminal for safety.
-
Consult the wiring diagram instructions, connecting wires to their respective terminals based on the designated functions (high beam, low beam, ground, etc.).
-
Reference the wiring diagram if you encounter any difficulties during installation.
If you are installing aftermarket headlights, they usually come with comprehensive instructions and a wiring diagram. If you picked headlights that are compatible with your car model year, that should be enough to make sure this diagram will work for you. Follow the installation guide provided by the manufacturer and you should do just fine!
Connecting Wires Based on Color Codes & Functions
Diagrams and color codes are meant to make it easier to rewire or replace headlights. They basically guide the process by telling you what each wire is supposed to do and where it should go to. That is if you know how to listen.
Not all wiring color code diagrams are the same. Some have more wires, and some use different color codes than others, but most vehicles on the market have this kind of color coding for each wire:
|
Wire Color |
Function |
|
Red/Orange |
Power or positive voltage (supplies power to headlights) |
|
Black/Brown |
Ground or negative connection (provides a return path for current) |
|
White/Light Blue |
Low beam headlights (controls low beam function) |
|
Blue/Dark Blue |
High beam headlights (controls high beam function) |
|
Yellow/Green |
Auxiliary functions (e.g., fog lights, additional lighting) |
|
Pink/Purple |
Special lighting features or indicator lights (e.g., turn signals, parking lights) |
These are just some common patterns, but you can find other uses for the same colors. That is why it is so important to consult the manual or instructions provided by the headlight manufacturer.
Once you figure out the functions according to the wiring color codes, you can proceed to connect everything. When connecting headlight wires, you must match the color-coded wires of the assembly with the corresponding wires from the vehicle's wiring harness. To do that, follow this simple step-by-step guide:
-
Find the connector or socket where the headlight bulb connects.
-
Examine the wires connected to the headlight bulb socket and find ground, low beam and high beam wires according to the diagram. There are may be more than three wires in there for more sophisticated headlights with some auxiliary functions.
-
Compare the color of each wire to the color codes from the instructions. Match the wires based on their corresponding functions.
-
Use crimp connectors, soldering, or appropriate wire connectors to ensure secure connections between these matched wires.
-
Always test the headlights. After making the connections, test the headlights to verify that everything works all right. Check both low beam and high beam functions, as well as any additional features.

Reviewed by Brent Ordway
Brent Ordway is an ASE-certified car technician. He has been working on cars since he was a teenager and loved helping people keep their vehicles running smoothly. Brent's skills as a mechanic are unrivaled. In 2022, he earned his place on the list of winners for the ASE Master Automobile Technician of the Year award.
Follow me